Monday, July 20, 2015

Port Forwarding - ZyXEL - NBG419N (ZyXEL Firmware)


Step 1.
Some routers & modems work best with port forwarding if you have a static local IP. 

Manually set your network interface card (NIC) to use a static ip address.

Step 2.
Open your favorite web browser and input your routers ip address in the address bar.
Please note that you must have the http:// in order to connect to your router/modem properly.


Step 3.
Enter the routers password and click the Login button.

If you have changed it and don't remember it you may have to reset your device to factory default using the reset button on most routers.


Step 4.
At the Welcome page click the "Go" button.
Once the page loads click the "Expert Mode" button at the top of the page.


Step 5
Once the page loads click the "Configuration" tab at the left of the screen.


Step 6
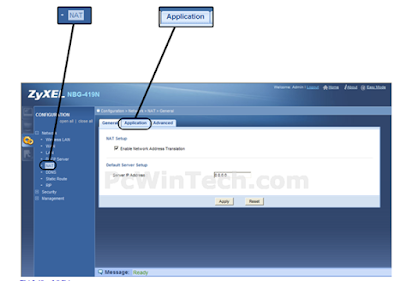
Once the page loads click the "NAT" link listed under "Network".
Now click the "Application" tab at the top of the page.


Step 7
Once the page loads listed under "Add Application Rule" check the "Active" box.

Now for "Service Name" give your rule a name, and select "User Defined" from the list.

For "Port" enter the port you want to forward.

For "Server IP Address" enter the IP of the computer you want to forward to.

Now Click the "Apply" button.

Repeat Step 7 to add more ports.


Monday, February 9, 2015

Install, Reinstall or Reset MikroTiK RouterOS: NetInstall

Sometimes the radio/ router becomes half past dead due to some causes. It receives power and that's all. It won't bring data. You have done the hard reset but nothing. Instead of throwing it away and declare it dead, you can revive it.
There is this program that is called NetInstall that runs on Windows computer that allows you to install, reinstall or reset MikroTiK RouterOS onto a PC or onto a RouterBOARD via an Ethernet cable.
What is required is;
You must have the program on your pc.
Your device must support booting from ethernet, and there must be a direct ethernet link from the Netinstall computer to the target device. All RouterBOARDs support network booting from Ether1 port.
Netinstall can also directly install RouterOS on a disk (USB/CF/IDE/SATA) that is connected to the Netinstall Windows machine. After installation just move the disk to the Router machine and boot from it.

Here are the steps;
1. Connect the MikroTik device to your pc using Ethernet cable
2. Run NetInstall

3. Now go to your network card and add ip

4. Go to NetInstall and click on Net Booting tab. On the window that has appeared, put an ip address on the same range as the ip you have put on your network card. Note: Not the same IP but the same range.

5. Then click Browse to select on your PC the OS to be installed on device (you must have downloaded it).
6. Now the hard reset part.
If the device is not displayed on Routers/Drives, it should after the successful hard reset.
7. Now select the device and the OS to be installed and click install tab

ANd the NetInstall part is done

Your device is revived now but it comes with 0.0.0.0 as IP address and other things like wireless interface are disabled.
You should reset it normally (not the hard reset)

and you are done.

Monday, February 2, 2015

Chatting in MikroTik

You are at your client troubleshooting their connection and there are some things that give you a hard time.
You want to make a call for assistant from your colleagues but you think that is so unprofessional in front of your client.
MikroTik can help you communicate with others!
Two or more admin can chat with each other through mikroTik's terminal
The only thing you need to do is to write your message after # sign and that's it,
other terminal user see your message
Example : #Ahmaizing!
Have fun

Friday, September 12, 2014

TzNog2

Held in Mwanza, 2014


With Mahina, one of the Instructors


Meet Patrick Okui from NSRC. one of the smartest IT guy and Instuctor


With Instructor Andy Linton and Hans Kuhn from NSRC


And this guy, He is my Supervisor. one of the coolest person you could work with. He is Bryson Justin

Thursday, July 24, 2014

MikroTik: Wireless Repeater

A wireless repeater (also called wireless range extender) takes an existing signal from a wireless router or access point and rebroadcasts it to create a second network.

After you have configured your MikroTik router and you want to extend the wireless accessibility, here are few simple steps you need to follow to configure the other router as a repeater;

1.a) Let us say your wireless SSID of the first router is MainRouter.

On the Repeater go to wireless interface and scan to connect to the first router. If this is successful then on SSID you will see the name of the first router "MainRouter".


b) Configure the Wireless Distribution System.

While still in the Wireless Interface, Click on WDS and select Dynamic on WDS Mode. And WDS Default Bridge should be Bridge-Local, if you have configured your local IP Address on it.


2. a) Now add the Virtual Interface by clicking on the + sign and selecting VirtualAP. It should appear as Wlan2. Click the Interface to configure Wireless SSID. Let us call the SSID: To_Clients. Master interface should be wlan1.


b)Then, Configure the WDS of Wlan2 as you have configured the previous one.


3. Go to Bridge and add ports ; wlan2 and wds2 if they did not appear by default.


4. If the main router had 192.168.88.1, then give the repeater another IP, say 192.168.88.2 it should work fine without IP but put it anyway to avoid confusions.


5. Go to wireless Security Profile and make sure that it has the same keys as the main router.


And there you go! Enjoy the Looong range of your wireless network.

Friday, May 2, 2014

How to setup Website Filter on D-Link DIR series router DIR-655

To setup Website Filter on D-Link DIR-655 Router.

Step 1: Open your web browser and type in the IP address of the router (192.168.0.1 by default).

Step 2: Enter the username (admin) and password (blank by default), and then click Ok or Log In .

Step 3: Click the Advance Tab and Website Filter on the left hand side of the screen. Select the option “Deny computers access to ONLY these sites” under Configure Website Filter below. You will be indicating what websites should be blocked or restricted on this router. Once your done click Save Settings.


Step 4: Next go-to the Access Control Tab and check the box to Enable Access Control. On Access Control you will need to setup a policy on the router for the Website Filter. Click Add Policy and follow the wizard.


Step 5: Click Next.

Step 6: Name the policy and click Next.


Step 7: Select a schedule and click Next.

Step 8: Select the machine(s) to which this policy applies by IP or MAC address and click Next.


Step 9: Select Filtering Method and click Next.

Step 10: Enable or Disable Web Access Logging and click Next.

Step 11: You should now see the policy listed at the bottom under Policy Table. Click Save Settings.

Tuesday, March 18, 2014

Configuring MikroTik Router

Winbox or browser can be used to do this. The demonstration here below is by using Winbox.

1. Go to Wireless tab on the left hand-side. on the screen that appears, choose the interface that is there and go to WIRELESS on the screen that has appeared.

The Mode by default is AP-bridge, and that is what it should be.

On SSID is where you put the name of the wireless you prefer


Next go to WDS Tab

configure as the image below demonstrates


2. While you are still on Wireless

Go to SECURITY PROFILE and click on the default interface that is there

WPA and WPA2 Pre-shared key is where you put your wireless security key/password


3. To configure IP Addresses, go to IP on the left handside of the screen and then choose ADDRESSES

Configure the public IP on ether1-gateway interface and private IP on the bridge-local interface


4. To configure the GATEWAY, Go to IP then ROUTES

Click the + sign to add the gateway interface. on the screen appeared, type the gateway on the gateway space


5. To configure DNS, go to IP then DNS.

On the screen that appears, type the DNS on the Servers space.

6. To configure the DHCP, go to IP then DHCP Server.

On the screen that appears, choose DHCP Setup and click next, next,.... if you have no changes to make. make sure the DHCP interface is the one you configured the private IP address.

And you are done.

ENJOY THE INTERNET :-)